


10 11x8in Clear Film

£4.30
This 11x8in Clear Film is used to make Film or 3-Part Number Plates & comes in packs of 10 sheets.
![]()
![]()
- Description
- Additional information
Description
- Size: 11×8 inch or 280x203mm
- Quantity: 10 Film Sheets
- Colour: Clear
- Printable: Yes
- For: Square 4×4 Number Plates
- Film Plates: Laminate to 11x8in LG EnviroPlate.
- 3-Part Plates: Match with 11x8in Clear Acrylic and Wet Reflective.
Our 11x8in Clear Film sheets are UV stable for colour fastness and highly durable. Each one of the 10 sheets is coated for better toner bonding, and either side can be printed on. And this size makes 2-line number plates for the rear of 4×4 vehicles. Tennants matched components are covered by our BSAU145e certification, shown on our website.
BSAU 145e Compliant

A Clear Film sheet makes both Film and 3-Part Number Plates. And is certified to British Standards, but only when you match it to specific components. Such as a 3mm LG EnviroPlate or when making 3-Part plates, between an acrylic face & wet reflective.
For more information on standards, regulations and our testing regime, check out our main site and the number plates pages or knowledge base.
Making Number Plates

Make a number plate using our 3 step process.
1: Design 2: Print 3: Assemble
Build it in our software, then print it out and simply assemble the matched components together.
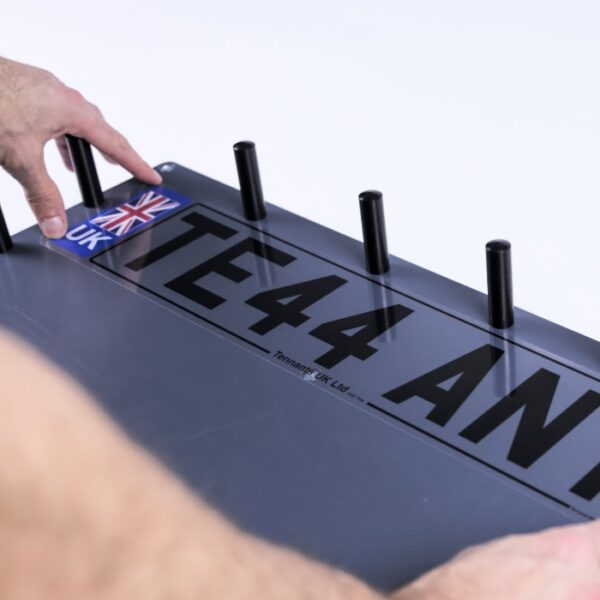
Assemble with a Jig & Roller
Whenever you make a printed number plate, we recommend using a jig and roller for a professional finish.
Film Plates
- Start by applying any Badge Panels to your printed Clear Film, for colour correction.
- Then use the pins and place your rigid LG EnviroPlate, face up on to the jig.
- Fold back a few centimetres of the adhesive cover at the end of the plate.
- Next, line up your Clear Film sheet on top, with the printed side facing downwards.
- Carefully join the components together at the Exposed Adhesive edge.
- Ensure both the edge and sides are correctly lined up before joining together.
- Now slide the two parts towards the Rollers at the end of the jig.
- Slowly Wind the arm so the components are fed through, keeping hold of the folded adhesive cover.
- This will remove the adhesive cover and Bond the two parts together.
3-Part Plates
- Place your Clear Film sheet, printed face up on the roller jig.
- Fold back a few centimetres of the adhesive cover at the end of an Acrylic Face.
- Position the Acrylic above the Film, Adhesive Side Down and carefully join the two pieces together
- Leading with the joined edge, keep hold of the Fold and slowly wind the arm & Feed the parts through the roller.
- This will remove the adhesive cover and bond the two parts together.
- Next, put a Wet Reflective adhesive face up on the jig, folding back part of its cover.
- Position the parts joined earlier on top with the Film Facing Down, join them together at the exposed edge
- Once again Feed them through the rollers, keeping hold of the folded adhesive cover.
- Finally, remove the final protective cover from the Acrylic Face.
Additional information
| Weight | 0.25 kg |
|---|---|
| Dimensions | 280 × 203 × 0.3 mm |
| Media Type | Clear Film, Film Plates, 3-Part Plates |
| Product Brand | Tennants UK |
You may also like…
-
 11x8in / 4x4 Plates
11×8 Film Bundles
£79.60 – £199.00Select options This product has multiple variants. The options may be chosen on the product pageQuick View -

 11x8in / 4x4 Plates
11×8 3-Part Bundles
£95.60 – £239.00Select options This product has multiple variants. The options may be chosen on the product pageQuick View


