


Economy Roller Jig

£175.00
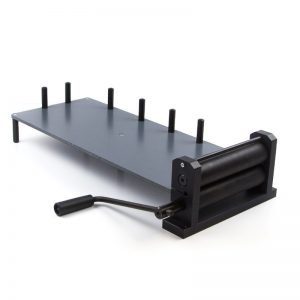
Our Economy Roller Jig is the perfect tool to help you assemble our plate media to make number plates with a professional finish.
Note: Pallet Shipped with extra costs.
- Description
- Additional information
Description
- SKU/Part No: nc113
- Size: 480 x 300mm & 8kg
- Type: Pin Jig with Fixed Rollers
- Max Width: 210mm
- Roller Height: 3mm
- Usage: Cold Laminating
- For: Combining Plate Media
- Pallet Shipped: Yes
The Economy Roller Jig is the perfect tool to help you assemble our plate media together. Not only do the pins help you to perfectly align and combine components. But the twin rollers are perfectly configured to compress and bond it all together.
Smaller and lighter than our Premium Jig, both the bed and lining-up pins are made from a durable plastic. While the soft rubber rollers have a fixed height of 3mm and a max width of 210mm. Which you’ll find is suitable for almost all number plate sizes on UK roads.
Using the Economy Roller Jig
Using this economy roller jig to assemble a number plate is simple and gets easier the more you do it. But you will need to follow some simple steps to ensure your plates have a professional finish. The sections below show how to assemble our 3 constructions, to make Film, Reflective and 3-Part plates. For more help check out our Knowledge Base articles.
Film Plates
For a film plate assemble your printed Clear Film sheet on top of a rigid White or Yellow ABS Plate.

- Place your Clear Film on the jig, with the rear of the side badge facing upwards.
- Now peel the adhesive cover off a white Badge Panel.
- Carefully position the panel above the side badge and Stick it into place.
- Put the film aside and place your rigid ABS Plate, face up on to the jig.
- Fold back a few centimetres of the adhesive cover at the end of the plate.
- Next, line up your Clear Film sheet on top, with the printed side facing downwards.
- Carefully join the components together at the Exposed Adhesive edge.
- Ensure both the edge and sides are correctly lined up before joining together.
- Now slide the two parts towards the Rollers at the end of the jig.
- Slowly Wind the arm so the components are fed through, keeping hold of the folded adhesive cover.
- This will remove the adhesive cover and Bond the two parts together.
Reflective Plates
To make a reflective plate laminate your printed Dry Reflective sheet on top a Clear Acrylic Face.

- Use the pins and place your Reflective on the jig, positioned flat and square.
- Fold back a few centimetres of the adhesive cover on an Acrylic face.
- Line up the Acrylic on top, Adhesive facing down towards the reflective.
- Carefully join the components together at the Exposed adhesive, ensure the edges match.
- Slide both parts towards the rollers, Joined edge nearest.
- Take and keep Hold of the folded adhesive cover.
- Slowly Wind the arm so the components are fed through the roller.
- The adhesive cover should be Removed while the roller bonds the parts together.
- Finally, remove the other protective Cover from the Acrylic.
3-Part Plates
You make a 3-Part Plate by laminating a printed Film Sheet between an Acrylic Face & Wet Reflective backing.

- Place your Clear Film on the jig, with the rear of the side badge facing upwards.
- Now peel the adhesive cover off a white Badge Panel.
- Carefully position the panel above the side badge and Stick it into place.
- Next turn your Film over so its facing upwards on the jig.
- Fold back a few centimetres of the adhesive cover at the end of an Acrylic Face.
- Position the Acrylic above the Film, Adhesive Side Down and carefully join the two pieces together
- Leading with the joined edge, keep hold of the Fold and slowly wind the arm & Feed the parts through the roller.
- This will remove the adhesive cover and bond the two parts together.
- Next, put a Wet Reflective adhesive face up on the jig, folding back part of its cover.
- Position the parts joined earlier on top with the Film Facing Down, join them together at the exposed edge
- Once again Feed them through the rollers, keeping hold of the folded adhesive cover.
- Finally, remove the final protective cover from the Acrylic Face.
Economy Roller Jig Maintenance
The jigs bed and vertical lining-up pins are made from a durable material which along with the roller sides can be easily wiped down. The rollers are made from a soft rubber, so take care when cleaning not to scour their surface. Use a lint free cloth and mild detergent, wipe away any dust or dirt and allow all surfaces to dry completely before further use.
Keep your economy roller jig in a clean environment so finished plates made with it aren’t contaminated with dirt or grease. If any pins become loose they can simply be tightened up by turning them clockwise.
Additional information
| Weight | 8 kg |
|---|---|
| Dimensions | 480 × 300 × 160 mm |
| Product Brand | Tennants UK |


